Introduction
This is a tutorial ( I am trying to brand this series as Tru-torials) how to develop a face mouse controller using Python. The goal is to create a controller that can be used to control a mouse and keyboard.
Background
Over the past couple of weeks I have been researching alternative control systems for Unity3D developed games. This has been a bit of a challenge as I have been unable to find a good solution. I have been looking for a solution that can be used for both mouse and keyboard control. I did fid a product for purchase that can do this and looks to be pretty awesome(full disclosure -I have not tested it yet). This if you want an off the self solution that works I would say try this out Smyle Mouse But I wanted to develop my own solution and if you do too, follow along.
So in this this post I will be going over the steps to develop a facial-feature detection mouse controller using Python.
Overview
This will use a webcam to detect the features of a face and then use those features to control the mouse and keyboard.
- The face detection is using the OpenSee repository.
- This is an awesome library that you should look into if you are interested in open source facial feature detection.
- There is even Unity Implementation of this library that I will probably discuss in another post.
- The mouse and keyboard control is using the PyAutoGui library.
The repository for this tutorial is here This is a forked version of the OpenSee repository with the mouse control added.
Face Detection
Ok So first lets see what is going on in the Open See facetracker.py script. If we use the -v=3 flag we can see the video output of the script.
parser.add_argument("-v", "--visualize", type=int, help="Set this to 1 to visualize the tracking, to 2 to also show face ids, to 3 to add confidence values or to 4 to add numbers to the point display", default=0)
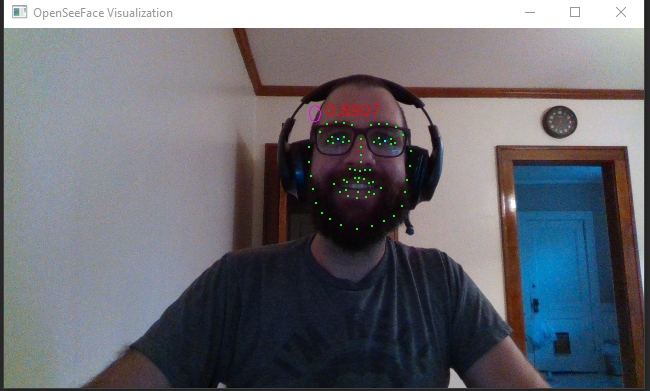
This will show the video feed and the face detection. I have also added a flag to show the face ids and confidence values.
There are a lot of things going on here. The OpenSee library is using a RetinaFace to detect the faces. There are also a few different models that can be used. The default model works for our simple use case.
After you are able to get the basic face detection working you can move on to the mouse control.
In the script I facetracker.py I have added a few lines of code display the x,y,z rotation angle of the face, you can see other data as well like the error and eye and mouth opening values.
print(f"Confidence[{f.id}]: {f.conf:.4f} / 3D fitting error: {f.pnp_error:.4f} / Eyes: {left_state}, {right_state}/ MOUTH: {f.current_features['mouth_open']} / 3D:{f.euler[0]}-{f.euler[1]}-{f.euler[2]}")
This shows the euler angles of the face. 
I am not sure what the 0,0,0 angles are but what we can do is look at the face and see if the rotation is correct. If it is correct then we can move on to the mouse control. Then in order to map these values to the mouse control we can start the program and look at each corner of the screen. Then track that output. This will give us a rough estimate of how to map the facial rotation to screen points.
156.58942772073817 20.374893700760367 86.8673196558616
155.8893341904558 19.857384278925675 86.94266243651117
156.5817871787999 19.434407038022194 86.52812698122263
156.63561078192464 19.024159270772987 86.61790734513602
156.3922743993038 18.89650054144338 86.57688385737625
156.73170835004925 18.648050262537854 86.68510143429138
156.6852229805895 18.91520694829618 86.66808812110409
156.6138374191849 18.06946609270158 87.03349687967004
This might be the part you need to edit for your own calibration. For me: The x values seem to only go from 140 - 170, and the y values seem to only go from -50 - 20.
The z axis is the tilt of the head and will not be used for this example, but might be useful for future projects.
Mouse Control
Next we are going to map this face control to the mouse. The first thing we need to do is find the size of the screen. PyAuthGui has a function to do this.
screen_size=pyautogui.size()
print(screen_size)
We will need a quick function to translate the face rotation to the screen points.
def face_euler_to_screen(value, faceMin, faceMax, screenMin, screenMax):
    # Figure out how 'wide' each range is
    leftSpan = faceMax - faceMin
    rightSpan = screenMax - screenMin

    # Convert the left range into a 0-1 range (float)
    valueScaled = float(value - faceMin) / float(leftSpan)

    # Convert the 0-1 range into a value in the right range.
    return screenMin + (valueScaled * rightSpan)
This remaps the range we set to the face rotation to the screen points.
 # Map the face position estimate to screen coordinates
x_trans = (math.ceil(face_euler_to_screen(f.euler[0], 140, 170, 0, screen_size.height)))
y_trans = (math.ceil(face_euler_to_screen(-f.euler[1], -50, 20, 0, screen_size.width)))
print("Screen Coordiantes:", y_trans, x_trans)
Great so now we can actually use th PyAutoGui to control the mouse.
| :warning: WARNING |
|---|
| If you did anything wrong you make have a hard time controller your system when you run becuase your face is gonna control your mouse, In PyCharm IDE the controls to hard stop the program is CTRL+F2 |
# Map the face position estimate to screen coordinates
x_trans = (math.ceil(face_euler_to_screen(f.euler[0], 140, 170, 0, screen_size.height)))
y_trans = (math.ceil(face_euler_to_screen(-f.euler[1], -50, 20, 0, screen_size.width)))
print("Screen Coordiantes:", y_trans, x_trans)
pyautogui.moveTo(y_trans, x_trans)
Finally lets implement a mouse click with opening the mouth. OpenSee gives a float value 0 - 1 on if the opening of mouth is detected
We can use this value to click the mouse with pyautogui.
if f.current_features['mouth_open'] > .80:
    pyautogui.click()
When the mouth is open the mouse is clicked.
And Voila! You have a face controller!
Conclusion
There is some refinement to be made in the code, but it is a good start. For example the face detection may make the mouse movement very jerky. This can be fixed with a making in x y tranformation rounded to the nearest 10 or something like that. This was just a quick Tru-torials to get you started with the face controller.
The read more about facial features detection look for papers with code
Here is a quick video to show what is possible with the face controller.